Adaptable Interactions with Core Data

Core Data has evolved over the years as one of Apple’s most valued frameworks. Within a matter of minutes, a developer can add an object management persistence system that supports a long list of built-in features such as change tracking, undo/redo functionality and more recently cloud synchronization.

The framework also provides some convenient drop-in components (FetchRequestNSFetchedResultsController), giving common UI elements the ability to interact with Core Data objects with minimal effort.

As an app and its code base grows, however, you might realize that using those components can result in views that host too much logic, making it hard if not impossible to unit test these interactions or reuse them.

Persistence layer code is most susceptible to change, making it critical that such logic should be flexible, maintainable and testable. What approach can we take to make our Core Data logic adhere to these requirements?

Clean code advocates would suggest completely abstracting the Core Data implementation behind protocols. This may include:

  • Repository protocols for each entity model
  • A separate adapter model for each Core Data object model (i.e Todo -> ManagedTodo)

Doing the above will not only make our code testable and portable, but future proof it as well. Abstracting our persistence layer behind protocols gives us the ability to swap out implementations as we see fit (Core Data, Realm, Firebase) with limited code changes.

As we add multiple entity types and relationships, however, that type of protocol abstraction can result in a lot of boilerplate and complexity. Before we buy in to this approach with our time and resources, maybe we should take a moment and ask ourselves an important question. Are we really going to need it?

YAGNI (You Aren’t Gonna Need It)

Let’s face, It would be an extremely rare case where we would need to change our implementation from Core Data to anything else. Having experienced the time sink and heavy boilerplate associated with persistence layer abstraction, I would not recommend it unless you have a team of developers or experimenting with a new database. The time spent preparing for some foreseeable circumstance can be better spent getting products or features out the door faster.

But that doesn’t mean there aren’t going to be other changes coming our way. Most fast go-to-market strategies are all about iteration. Iteration being a keyword here. This implies that changes to our code are inevitable. So how can we go about ensuring our Core Data logic is best suited to adapt to the changes that lie ahead?

Theming abstractions around interactions

Let’s try another approach where instead of framing our abstractions around separating implementation logic, we formulate them on interactions instead.

If we were to map out persistence interactions for a Todo app, for instance, the list of possible actions could include:

  • Adding a Todo
  • Updating a Todo
  • Deleting a Todo
  • Fetching a list of Todos

Let’s see what an interaction implementation of adding a Todo item might look like:

class AddTodoCase {
    @Inject
    private var viewContext: NSManagedObjectContext

    struct Input {
        let title: String
    }

    func call(_ input: Input) -> AnyPublisher<Todo, Error> {
        Deferred { [viewContext] in
            Future { promise in
                viewContext.perform {
                    let todo = Todo(context: viewContext)
                    todo.title = input.title
                    todo.createdAt = Date()
                    do {
                        try viewContext.save()
                        promise(.success(todo))
                    } catch {
                        promise(.failure(error))
                    }
                }
            }
        }
        .receive(on: DispatchQueue.main)
        .eraseToAnyPublisher()
    }
}

In the code above, we define the interaction of saving a newly added Todo into its own class. For naming consistency, we describe the class’s name as a use case. Each use case has a callable (i.e call()) method that takes an Input and produces a result. For the case of persisting a new Todo, the signature of the method is a Publisher to account for its async nature.

Under the hood, the method will create the Todo Core Data object and persist it, catching and communicating any errors to a subscriber. Notice we supply the NSManagedObjectContext to the class via an injection property wrapper, eliminating the need for consumers of the class to know about its construction.

Let’s see how a view model would use this use case:

class ViewModel: ObservableObject {
    @Published
    var loading = false
    private let addTodoCase = AddTodoCase()
    private var cancellables = Set<AnyCancellable>()

    func addTodo(title: String) {
        loading = true
        let input = AddTodoCase.Input(title: title)
        addTodoCase.call(input)
            .sink { [weak self] completion in
                switch completion {
                case .failure:
                    debugPrint("something isn't right")
                    self?.loading = false
                case .finished:
                    break
                }
            } receiveValue: { [weak self] todo in
                self?.loading = false
                debugPrint("\(todo) added")
            }
            .store(in: &cancellables)

    }
}

Note how our view model is oblivious to how the Todo is saved, decoupling it from any persistence logic. Such ignorance allows us to blissfully iterate our logic with minimal code changes.

Let’s assume we later learn that some of our users want to categorize their Todo items. As a result, we add the Category entity to our model editor and define the relationship. We then update our use case to accept the optional category parameter:

class AddTodoCase {
    @Inject
    private var viewContext: NSManagedObjectContext

    struct Input {
        let title: String
        var category: Category? = nil
    }

    func call(_ input: Input) -> AnyPublisher<Todo, Error> {
        Deferred { [viewContext] in
            Future { promise in
                viewContext.perform {
                    let todo = Todo(context: viewContext)
                    todo.title = input.title
                    todo.createdAt = Date()
                    todo.category = input.category
                    do {
                        try viewContext.save()
                        promise(.success(todo))
                    } catch {
                        promise(.failure(error))
                    }
                }
            }
        }
        .receive(on: DispatchQueue.main)
        .eraseToAnyPublisher()
    }
}

In this circumstance, we aren’t required to make any changes to our view model!

Additional benefits of this approach:

  • Persistence logic is separated, allowing us to reuse the class in more than one view model or even use case
  • By using property wrapper injection, our use cases can add or remove dependencies without resulting in any changes to its consumers
  • By defining an Input model for each use case, we have the flexibility of adding parameters without needing to change the definition of its methods
  • We have a nice repeatable pattern for defining interactions in our code base

One aspect of this approach that we are yet to touch upon is testability. By avoiding abstracted protocols, our unit tests won’t be able to provide mock implementations or mocked entities for our persistence logic. But that doesn’t mean our approach isn’t testable. Luckily Core Data comes with an in-memory persistent store that works really well for unit tests!

Conclusion

Persistence layer code is most susceptible to change as an app evolves and adds new features. By organizing that logic around interactions, we can increase the adaptability of our code base and be better prepared for the changes that lie ahead.

Side Effects with Combine

One of the benefits of adopting Combine’s publisher approach to asynchronous programing is that every operation is a stream or pipeline that we can subscribe and react to via powerful operators.

This works really well for situations where would like to execute code outside the scope of a publisher as certain events occur. Such executions are often described as side effects

What are side effects?

For the context of this article and within the realm of Combine, we can define side effects as invocations that do not transform the output of a publisher which are triggered when certain events occur during a publisher’s lifecycle.

Common use cases for side effects in reactive programming include but are not limited to:

  • Debugging
  • Error handling
  • Event tracking
  • Persisting data

So how would we go about implementing side effects in Combine?

Handling events

Combine provides a useful handleEvents() operator that allows us to provide closures that can be performed when certain publisher events occur. This makes it possible, for example, to log relevant information in the event of a non-fatal error:

todoRepository.addTodo(title: title)
    .handleEvents(receiveCompletion: { [logger] completion in
        switch completion {
        case .failure(let error):
            logger.error(error)
            debugPrint("an error occurred: \(error)")
        case .finished:
            debugPrint("addTodo publisher completed")
        }
    })

In addition to the receiveCompletion parameter, the operator provides other events that we can hook into that can serve a variety of use cases:

receiveSubscription:

Executes when the publisher receives the subscription from the upstream publisher. A possible use case for this would be to launch a background process/experience whenever a consumer subscribes:

videoCallProvider.acceptCall()
    .handleEvents(receiveSubscription: { [cameraManager] _ in
        cameraManager.startCapture()
    })

receiveOutput:

Executes when the publisher receives a value from the upstream publisher. In the pattern we put together in my previous article Managing View State Combine, we could use this to keep track of Inputs as users interact with our views:

inputSubject
    .handleEvents(receiveOutput: { [eventTracker] input in
        switch input {
        case .addTodo:
            eventTracker.track(.todoAdded)
        case .todoRemoved:
            eventTracker.track(.todoRemoved)
        }
    })

receiveCancel:

Executes when the downstream receiver cancels publishing. A good use case for this would be disposing of no longer needed processes that live outside of a publisher’s lifecycle:

videoCallProvider.acceptCall()
    .handleEvents(receiveCancel: { [cameraManager] in
        cameraManager.endCapture()
    })

receiveRequest:

Executes when the publisher receives a request for more elements. Had a hard time thinking of a good use case for this one, but could come in handy during situations where we would like know the amount of outputs being requested by a subscriber.

Note: closures passed to these parameters are escaped, and as a result, subject to the dangers of strong reference cycles or wrong thread executions. Make sure to avoid strong references by using capture lists and insuring the closure is performed on the appropriate thread via the receive(on:) operator.

A tip when handling events 💡:

You might have noticed when typing handleEvents, Xcode will autofill all possible parameters of the method. This can be annoying to deal with, especially if we find ourselves handling specific events frequently. Lets try and fix that with some convenient extensions:

extension Publisher {
    func handleOutput(_ receiveOutput: @escaping ((Self.Output) -> Void)) -> Publishers.HandleEvents<Self> {
        handleEvents(receiveOutput: receiveOutput)
    }

    func handleError(_ receiveError: @escaping ((Self.Failure) -> Void)) -> Publishers.HandleEvents<Self> {
        handleEvents(receiveCompletion: { completion in
            switch completion {
            case .failure(let error):
                receiveError(error)
            case .finished:
                ()
            }
        })
    }
}

With the extensions above, not only will interacting with the operator become more enjoyable, but the end result ends ups looking more readable:

todoRepository.addTodo(title: title)
    .handleOutput({ [eventTracker] _ in
        eventTracker.track(.todoAdded)
    })
    .handleError({ [logger] error in
        logger.error(error)
        debugPrint("an error occurred: \(error)")
    })

Conclusion

In situations where we would need to execute some code along side other asynchronous code, the Combine framework can serve as a good candidate given its elegant approach to performing side effects.

The Core Data CloudKit Paradox

What came first? the chicken or the egg? The ancient paradox that describes the problem of determining cause and effect. Maybe the answer is both? This oddly resonates with a common problem when it comes to projects that utilize the NSPersistentCloudKitContainer.

The Paradox

When an app is first launched, it can take sometime for the user’s device to setup and import Core Data objects from the cloud. Let’s imagine our app had some initial onboarding screens that set up the app experience. If a user has previously gone through the setup, we might find ourselves at the risk of merge conflicts as data is eventually synced on the device, not to mention a bad user experience.

How can we determine if a newly setup device has data to sync if we need to wait for the sync to occur in the first place?

There are number of ways we can go about it.

iCloud Key-Value Store

Apple provides a mechanism for storing app-state data on a user’s iCloud account via NSUbiquitousKeyValueStore class:

let keyValueStore = NSUbiquitousKeyValueStore.default
keyValueStore.setValue(true, forKey: "setup-complete")
if !keyValueStore.synchronize() {
    fatalError("app was not built with proper entitlement requests")
}

We could then use the stored value to determine which experience to load for the user:

struct IntroView: View {
    var body: some View {
        if NSUbiquitousKeyValueStore.default.bool(forKey: "setup-complete") {
            WaitForSyncView()
        } else {
            OnboardingView()
        }
    }
}

Limitations to this approach:

  • NSUbiquitousKeyValueStore is limited to 1 MB of storage for the whole app. This should be fine for our use case, but something to consider if planning on storing other data.
  • Suffers from the same problem we are trying to solve. We can’t control when the sync happens, meaning there could be a significant delay from app install to the value being synced.

Using Core Data

Another possible solution would be to store a Core Data object and then check for the existence of the record when the app launches.

Record user setup:

let viewContext = CoreDataStore.container.viewContext
let setup = InitialSetup(context: viewContext)
setup.createdAt = Date()
do {
    try viewContext.save()
} catch {
    debugPrint("an error occurred saving initial setup: \(error.localizedDescription)")
}

We could then fetch any instances of the InitialSetup object using the FetchRequest property wrapper, reacting to changes as they are synced:

struct IntroView: View {
    @FetchRequest(entity: InitialSetup.entity(), sortDescriptors: [])
    private var setups: FetchedResults<InitialSetup>
    var body: some View {
        if setups.isEmpty {
            OnboardingView()
        } else {
            WaitForSyncView()
        }
    }
}

Limitations to this approach:

  • Similar to our previous solution, sync is not in our control and could potentially take longer depending on other objects being imported.

Using CloudKit

When we use NSPersistentCloudKitContainer, our Core Data objects are magically transformed into CKRecords and persisted on a user’s CloudKit database behind the scenes. As a result, the CloudKit database knows whether or not a user has used our app.

Unfortunately there isn’t a straightforward method of querying those CKRecords directly. But since we are already using CloudKit, we could create our own record and check for its existence via the CloudKit framework:

let record = CKRecord(recordType: "InitialSetup")
let database = CKContainer.default().privateCloudDatabase
database.save(record) { _, error in
    if let error = error {
        debugPrint("an error occurred saving initial setup: \(error.localizedDescription)")
    }
}

We then query for record when view appears and display the appropriate flow based on the result:

struct IntroView: View {

    enum ViewState {
        case loading
        case content(setupComplete: Bool)
        case error(Error)
    }

    @State
    private var viewState: ViewState = .loading
    var body: some View {
        content(viewState)
            .onAppear {
                determineFlow()
            }
    }

    @ViewBuilder
    private func content(_ viewState: ViewState) -> some View {
        switch viewState {
        case .loading:
            ProgressView()
        case .error:
            Text("Oops! Something isn't right")
        case .content(let setupComplete):
            if setupComplete {
                WaitForSyncView()
            } else {
                OnboardingView()
            }
        }
    }

    private func determineFlow() {
        let query = CKQuery(recordType: "InitialSetup",
                            predicate: NSPredicate(value: true))
        let database = CKContainer.default().privateCloudDatabase
        database.perform(query,
                         inZoneWith: CKRecordZone.default().zoneID) { records, error in
            DispatchQueue.main.async {
                if let error = error {
                    viewState = .error(error)
                    return
                }
                guard let records = records else {
                    // suggests it's a new user
                    viewState = .content(setupComplete: false)
                    return
                }
                viewState = .content(setupComplete: !records.isEmpty)
            }
        }
    }
}

The benefit of using this approach compared to the previous two, is that the logic to determine a previous user does not rely on synchronization that isn’t in our control. When we make the request to fetch the records, we are accessing the cloud database directly rather than waiting for the data to eventually make its way to the device.

Another aspect of this approach, is that it can be used for a variety of sync related use cases. We might find ourselves in a situation, for instance, where we would like to prevent multiple devices from syncing with an external server. Using a CKRecord type that host timestamps and vendor identifiers, we can prevent multiple devices from attempting to sync duplicate content.

Limitations to this approach:

  • An internet connection is required. As a result we would probably need to have a fallback experience in the event of no connection.

Conclusion

For syncable Core Data projects, determining if a new device is associated with a previous iCloud account can be tricky. In this article we learned three possible approaches each with their respective limitations. I prefer the CloudKit solution given its the only approach of the three that seems to solve the paradox

Combining Core Data with Generics

Combining Core Data with Generics

If you’ve caught the Combine bug, chances are you are beginning to leverage the framework for all sorts of asynchronous logic in your code base. One such area that I’ve found myself interacting with a lot lately in this regard is Core Data.

When Apple debuted Combine in iOS 13, the release included some convenient publisher apis for NSManagedObject, mainly in the form of publishers for key-value observation and conformation to the ObservableObject protocol. Despite this, however, there is still a lot to be desired.

Fetching, adding and deleting objects are asynchronous in nature and would fit perfectly into the publisher world of Combine. Luckily with Deferred Futures, we can attach publisher functionality to our Core Data interactions with minimal effort:

func addTodo(context: NSManagedObjectContext, title: String) -> AnyPublisher<Todo, Error> {
    Deferred { [context] in
        Future { promise in
            context.perform {
                let todo = Todo(context: context)
                todo.title = title
                do {
                    try context.save()
                    promise(.success(todo))
                } catch {
                    promise(.failure(error))
                }
            }
        }
    }
    .receive(on: DispatchQueue.main)
    .eraseToAnyPublisher()
}

In a project that spans multiple Core Data entities, however, wrapping this sort of logic can end up in a lot of repetitive code. Let’s discover how we can leverage generics to attach publisher functionality to any Core Data object

Identifying common interactions

If we were to familiarize ourselves with any Core Data project, we’d probably identify the following common interactions when it comes to its managed objects:

  • Fetching a list of objects with the ability to filter or sort them
  • Fetching a single existing object
  • Adding a new object
  • Updating an existing object
  • Deleting an existing object

The above interactions might look very similar to an abstracted repository pattern, which ends up being a good name for our generic class:

class CoreDataRepository<Entity: NSManagedObject> {
    private let context: NSManagedObjectContext

    init(context: NSManagedObjectContext) {
        self.context = context
    }
}

Above we’ve defined a class that has a generic placeholder type conveniently named Entity. We specify that our generic placeholder needs to be a type that inherits NSManagedObject. Through this specification, we will be able to call relevant methods that are associated with an NSManagedObject such as fetch requests.

We also require our class to be instantiated with an NSManagedObjectContext. By following an Inversion of Control (IoC) pattern with our context, we provide consumers of the class with the flexibility to specify the context depending on the circumstance (i.e view context or background context).

Now that we’ve got the foundation for our generic repository class in place, let’s start implementing the interactions we identified earlier in this section.

Fetching a list of objects

Fetching objects in Core Data usually involves creating a fetch request, and optionally providing additional filters or sorting specifications in the form of NSPredicates or NSSortDescriptors:

let request: NSFetchRequest<Todo> = Todo.fetchRequest()
request.sortDescriptors = [NSSortDescriptor(keyPath: \Todo.title, ascending: true)]
do {
    let todos = try context.fetch(request)
    return todos
} catch {
    debugPrint("an error occurred \(error.localizedDescription)")
}

If we were to make this functionality more reusable and adjust it to work with our new generic publisher implementation, we could define the method as follows:

class CoreDataRepository<Entity: NSManagedObject> {
    //...

    func fetch(sortDescriptors: [NSSortDescriptor] = [],
               predicate: NSPredicate? = nil) -> AnyPublisher<[Entity], Error> {
        Deferred { [context] in
            Future { promise in
                context.perform {
                    let request = Entity.fetchRequest()
                                        request.sortDescriptors = sortDescriptors
                    request.predicate = predicate
                    do {
                        let results = try context.fetch(request) as! [Entity]
                        promise(.success(results))
                    } catch {
                        promise(.failure(error))
                    }
                }
            }
        }
        .receive(on: DispatchQueue.main)
        .eraseToAnyPublisher()
    }
    //..
}

Requesting a specific object

The Core Data framework provides several methods for querying an existing object. For our repository class, we are going to assume that we would like to fetch an object only if it exists and throw an error otherwise. This is where we can leverage the existingObject method on the NSManagedObjectContext class:

guard let todo = try? context.existingObject(with: id) as? Todo else {
    return
}

Making the above more reusable we can apply it to our generic class through the following:

enum RepositoryError: Error {
    case objectNotFound
}

class CoreDataRepository<Entity: NSManagedObject> {
    // ..

    func object(_ id: NSManagedObjectID) -> AnyPublisher<Entity, Error> {
        Deferred { [context] in
            Future { promise in
                context.perform {
                    guard let entity = try? context.existingObject(with: id) as? Entity else {
                        promise(.failure(RepositoryError.objectNotFound))
                        return
                    }
                    promise(.success(entity))
                }
            }
        }
        .receive(on: DispatchQueue.main)
        .eraseToAnyPublisher()
    }
    // ..
}

Note above we throw a custom error in the event that we fail to find the object. This could help with error management down stream if we’d like to replace the occurrence of the error with a fallback experience in our app.

Adding a new object

When it comes to creating or adding new objects, putting together a generic implementation can be a little tricky. This is because each entity would have it’s own respective attributes that are assembled prior to persisting the newly added object:

let todo = Todo(context: context)
todo.title = title
todo.createdAt = Date()
do {
    try context.save()
} catch {
        debugPrint("an error occurred \(error.localizedDescription)")
}

How can put together a function that provides the caller with the ability to apply changes to the object prior to persisting it? This is where we can make use of Swift’s convenient in-out parameter:

class CoreDataRepository<Entity: NSManagedObject> {
    // ..
    func add(_ body: @escaping (inout Entity) -> Void) -> AnyPublisher<Entity, Error> {
        Deferred { [context] in
            Future  { promise in
                context.perform {
                    var entity = Entity(context: context)
                    body(&entity)
                    do {
                        try context.save()
                        promise(.success(entity))
                    } catch {
                        promise(.failure(error))
                    }
                }
            }
        }
        .eraseToAnyPublisher()
    }
        //..
}

Updating or deleting an existing object

Updating or deleting an object is a little more straightforward, especially if the expectation is to persist the changes immediately:

class CoreDataRepository<Entity: NSManagedObject> {
    // ..

    func update(_ entity: Entity) -> AnyPublisher<Void, Error> {
        Deferred { [context] in
            Future { promise in
                context.perform {
                    do {
                        try context.save()
                        promise(.success(()))
                    } catch {
                        promise(.failure(error))
                    }
                }
            }
        }
        .receive(on: DispatchQueue.main)
        .eraseToAnyPublisher()
    }

    func delete(_ entity: Entity) -> AnyPublisher<Void, Error> {
        Deferred { [context] in
            Future { promise in
                context.perform {
                    do {
                        context.delete(entity)
                        try context.save()
                        promise(.success(()))
                    } catch {
                        promise(.failure(error))
                    }
                }
            }
        }
        .receive(on: DispatchQueue.main)
        .eraseToAnyPublisher()
    }

    // ..
}

Putting it all together

Now that we’ve defined the functionality of our generic repository implementation, we can attach CRUD publisher functionality to any object that inherits from the NSManagedObject class:

// create a repo for the relevant entity with the relevant context
let repo = CoreDataRepository<Todo>(context: context)

// add an entity
repo.add { todo in
    todo.title = "Hello Generics"
}
.sink { completion in
    switch completion {
    case .failure(let error):
        debugPrint("an error occurred \(error.localizedDescription)")
    case .finished:
        break
    }
} receiveValue: { todo in
    debugPrint("todo has been added")
}

// fetch entities
repo.fetch(sortDescriptors: [NSSortDescriptor(keyPath: \Todo.title, ascending: true)])
    .replaceError(with: [])
    .sink { todos in
        debugPrint("\(todos.count) todos fetched")
    }

// get an existing object
repo.object(todoId)
    .sink { completion in
        switch completion {
        case .failure(let error):
            debugPrint("an error occurred \(error.localizedDescription)")
        case .finished:
            break
        }
    } receiveValue: { todo in
        debugPrint("hello \(todo.title) object")
    }

// update an entity
todo.title = "updated title"
repo.update(todo)
    .sink { completion in
        switch completion {
        case .failure(let error):
            debugPrint("an error occurred \(error.localizedDescription)")
        case .finished:
            break
        }
    } receiveValue: { _ in
        debugPrint("todo updated")
    }

// delete an entity
repo.delete(todo)
    .sink { completion in
        switch completion {
        case .failure(let error):
            debugPrint("an error occurred \(error.localizedDescription)")
        case .finished:
            break
        }
    } receiveValue: { _ in
        debugPrint("todo deleted")
    }

Conclusion

Generics enable us to write flexible, reusable functionality that can work with any type, serving as a great tool for avoiding duplicate or repetitive code. In this article we learned how we could use generics to attach reusable publisher functionality to any Core Data object.

Abstracting Navigation in SwiftUI

At first glance, navigation in SwiftUI seems pretty straightforward. With a combination of NavigationViewNavigationLink and .sheet, we can quickly link views together in ways that resemble UIKit.

But when an app grows more than a handful of views, or you find yourself in situations where you need a more flexible method of triggering navigation, you’ll quickly discover that the framework falls short.

This is largely due to navigation being tightly coupled and hardcoded within its views, becoming increasingly more difficult to:

  • Reuse views in different flows
  • Adjust or make changes to our flows as we iterate
  • Trigger navigation outside the the scope of the view (i.e view models, network requests)

Advanced architectural patterns usually advocate for keeping navigation logic independent of their views, so what approach can we take to decouple navigation logic? Let’s start with a little abstraction

Abstracting navigation

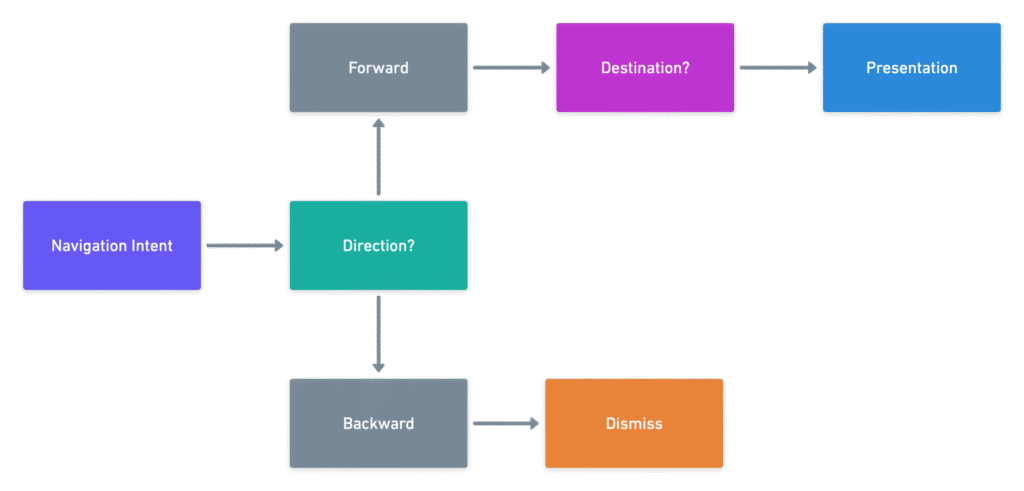
If we were to strip out any infrastructure or UI frameworks from the navigation experience, we could map it out into a flow diagram like the following:

When there is an intent to navigate, we determine which direction we would like to go. Are we returning to a previous experience (navigating backward)? Or are we moving onto the next step of the flow (navigating forward)? Based on the direction, the intent will either result in a new destination being presented or some form of a dismissal

Lets try and translate the above into relevant entities:

enum NavigationDirection {
    case back
    case forward(destination: NavigationDestination, style: NavigationStyle)
}

A navigation intent will either be a forward or backward motion. In the case of going back, there isn’t an obvious need to include any associative data. However when it comes to advancing to another screen or experience, a navigable entity should know it’s destination

enum NavigationDestination {
    case addTodo
    case todoDetails(todo: Todo)
}

The NavigationDestination enum is where we’d map out all the possible destinations (screens) of our app. We can leverage associative types here by including any relevant information a destination needs to build its views as demonstrated with the todoDetails case.

enum NavigationStyle {
    case push
    case present
}

It’s fairly common a platform will have more than way of presenting a view. The NavigationStyle entity will provide a means of specifying the intended presentations style.

With these entities in place, we now have a good representation of navigation that does not include any framework specific code.

Presentation

Given the reactive functional nature of SwiftUI, it’s likely that our view models will be observable objects that we can subscribe to and receive updates. With that in mind, a good means of communicating navigation intents as they occur would be via a published property:

import Combine

class ViewModel: ObservableObject {
    @Published
    var navigationDirection: NavigationDirection?
}

All changes to the published property by the view model will be communicated to an interested View:

class ViewModel: ObservableObject {
    @Published
    var navigationDirection: NavigationDirection?
    // ..

    func todoTapped(_ todo: Todo) {
        navigationDirection = .forward(destination: .todoDetails(todo: todo), style: .push)
    }

    // ..
}

With this approach, our view models have the flexibility to trigger navigation updates in a variety of ways, even during async operations:

class ViewModel: ObservableObject {
    private var todoRepository = TodoRepository.shared
    private var cancellables = Set<AnyCancellable>()
    @Published
    var navigationDirection: NavigationDirection?
    @Published
    var loading: Bool = false

    func addTodo(title: String) {
        loading = true
        todoRepository.addTodo(title: title)
            .receive(on: DispatchQueue.main)
            .sink { [unowned self] _ in
                navigationDirection = .back
            }
            .store(in: &cancellables)
    }

    // ..
}

That’s pretty neat but how will our View be able to process a NavigationDirection update?

The final layer

ViewModifiers are great in the sense that not only can they modify the look and feel of our views, but they can also add functionality in a reusable composable way. Leveraging this functionality, we can create a modifier to provide any view with the capability to respond to a NavigationDirection update:

struct NavigationHandler: ViewModifier {
    @Binding
    var navigationDirection: NavigationDirection?
    var onDismiss: ((NavigationDestination) -> Void)?
    @State
    private var destination: NavigationDestination?
    @State
    private var sheetActive = false
    @State
    private var linkActive = false
    @Environment(\.presentationMode) var presentation
    let viewFactory = ViewFactory()
    func body(content: Content) -> some View {
        content
            .background(
                EmptyView()
                    .sheet(isPresented: $sheetActive, onDismiss: {
                        if let destination = destination {
                            onDismiss?(destination)
                        }
                    }) {
                        buildDestination(destination)
                    }
            )
            .background(
                NavigationLink(destination: buildDestination(destination), isActive: $linkActive) {
                    EmptyView()
                }
            )
            .onChange(of: navigationDirection, perform: { direction in
                switch direction {
                case .forward(let destination, let style):
                    self.destination = destination
                    switch style {
                    case .present:
                        sheetActive = true
                    case .push:
                        linkActive = true
                    }
                case .back:
                    presentation.wrappedValue.dismiss()
                case .none:
                    break
                }
                navigationDirection = nil
            })
    }

    @ViewBuilder
    private func buildDestination(_ destination: NavigationDestination?) -> some View {
        if let destination = destination {
            viewFactory.makeView(destination)
        } else {
            EmptyView()
        }
    }
}

Above, we put together a modifier that attaches a sheet and an invisible NavigationLink to the relevant view. via the onChange method, we subscribe to changes from from the binding navigationDirection property and based on the direction we either:

  • Present or push the destination depending on the supplied style when moving forward or
  • Dismiss the current view regardless of its presentation style using the presentationMode environment value when moving backward

Once we set the destination and toggle the state of either presentation styles, the modifier will turn to our buildDestination() method to build the relevant view associated with the destination. In the code example above, we are using a factory approach to provide the view.

Let’s make a quick extension to make our modifier easier to to apply to our views:

extension View {
    func handleNavigation(_ navigationDirection: Binding<NavigationDirection?>,
                          onDismiss: ((NavigationDestination) -> Void)? = nil) -> some View {
        self.modifier(NavigationHandler(navigationDirection: navigationDirection,
                                        onDismiss: onDismiss))
    }
}

and now an example of view that makes use of the modifier:

struct TodoListView: View {
    @StateObject
    private var viewModel = ViewModel()
    var body: some View {
        NavigationView {
            Text("This view will be able to process a navigation update")
                .handleNavigation($viewModel.navigationDirection)
        }
    }
}

Note: we access the viewModel via the $-prefix syntax to generate a binding to it’s navigationDirection property

And there we have it, a somewhat abstracted approach to handling navigation in our SwiftUI apps.

Benefits to this approach:

  • Navigation logic is separated from our view, making it a lot easier to change user flows or reuse our views in different areas of the app.
  • With the view model being responsible for orchestrating navigation, we can do flexible things like trigger a navigation after a network request completes
  • We can now test navigation interactions via our view models’ unit tests

An important note: We still need to manually ensure that a view’s hierarchy has access to a NavigationView when using the push presentation style. This takes us away from true abstraction nirvana, but despite this minor setback we find ourselves in a much more flexible state.

Conclusion

SwiftUI’s approach to navigation can quickly get challenging and limiting when it comes to programmatic navigation or building modular user flows. By abstracting and separating navigation logic from our views, we can increase the reusability, modularity and maintainability of our code base.

Awaiting WebSockets in SwiftUI

WebSockets have become the standard network protocol for chat and event-driven based applications given their ability to provide a persistent communication channel between clients and a server. Rather than poll a server for results at set intervals, WebSockets emit messages as they become available to connected participants resulting in reduced latency and bandwidth.

Apple provides in-built tools via the URLSession object class to connect to a WebSocket and receive events. However, despite recent updates leveraging Swift’s newer concurrency features in iOS 15, the class does not make use of one of Swift’s more powerful concurrency features; AsyncSequence

What is AsyncSequence?

Apple’s documentation defines AsyncSequence as a type that list values you can step through one at a time while adding asynchroncity. Unlike a regular Sequence, an AsyncSequence may have all, some or none of its values when you first use it. As a result, you await to receive values as they become available.

The description above sounds oddly familiar to how a WebSocket emits messages, making it an ideal type for implementing a more concurrent-friendly api that can be consumed via the following syntax :

for try await message in socket {
    // do something with a message
}

Building an Async WebSocket Stream

<span class="hljs-keyword">import</span> Foundation

<span class="hljs-class"><span class="hljs-keyword">class</span> <span class="hljs-title">WebSocketStream</span>: <span class="hljs-title">AsyncSequence</span> </span>{

    <span class="hljs-keyword">typealias</span> <span class="hljs-type">Element</span> = <span class="hljs-type">URLSessionWebSocketTask</span>.<span class="hljs-type">Message</span>
    <span class="hljs-keyword">typealias</span> <span class="hljs-type">AsyncIterator</span> = <span class="hljs-type">AsyncThrowingStream</span>&lt;<span class="hljs-type">URLSessionWebSocketTask</span>.<span class="hljs-type">Message</span>, <span class="hljs-type">Error</span>&gt;.<span class="hljs-type">Iterator</span>

    <span class="hljs-comment">//...</span>
}

Above we define a WebSocketStream class that conforms to the AsyncSequence protocol. The protocol requires specifying the output Element of the sequence, which in this case is a URLSessionWebSocketTask.Message . We also need to specify associated type of the AsyncIterator, which will be an AsyncThrowingStream.Iterator as the stream can potentially error out while listening to the WebSocket.

<span class="hljs-class"><span class="hljs-keyword">class</span> <span class="hljs-title">WebSocketStream</span>: <span class="hljs-title">AsyncSequence</span> </span>{

    <span class="hljs-comment">//..</span>

    <span class="hljs-keyword">private</span> <span class="hljs-keyword">var</span> stream: <span class="hljs-type">AsyncThrowingStream</span>&lt;<span class="hljs-type">Element</span>, <span class="hljs-type">Error</span>&gt;?
    <span class="hljs-keyword">private</span> <span class="hljs-keyword">var</span> continuation: <span class="hljs-type">AsyncThrowingStream</span>&lt;<span class="hljs-type">Element</span>, <span class="hljs-type">Error</span>&gt;.<span class="hljs-type">Continuation?</span>
    <span class="hljs-keyword">private</span> <span class="hljs-keyword">let</span> socket: <span class="hljs-type">URLSessionWebSocketTask</span>

    <span class="hljs-keyword">init</span>(url: <span class="hljs-type">String</span>, session: <span class="hljs-type">URLSession</span> = <span class="hljs-type">URLSession</span>.shared) {
        socket = session.webSocketTask(with: <span class="hljs-type">URL</span>(string: url)!)
        stream = <span class="hljs-type">AsyncThrowingStream</span> { continuation <span class="hljs-keyword">in</span>
            <span class="hljs-keyword">self</span>.continuation = continuation
            <span class="hljs-keyword">self</span>.continuation?.onTermination = { @<span class="hljs-type">Sendable</span> [socket] <span class="hljs-number">_</span> <span class="hljs-keyword">in</span>
                socket.cancel()
            }
        }
    }

    <span class="hljs-comment">//..</span>
}

Our initializer takes in a url string and a URLSession object which we use to build a URLSessionWebSocketTask to listen and process web socket messages.

We also create a local AsyncThrowingStream property which will be used to provide an AsyncIterator when a task awaits the values of this sequence.

Note that we also keep a reference to the stream’s continuation, which will allow us to signal messages as they come in from the WebSocket server.

In order to conform to the AsyncSequence protocol we need to implement the makeAsyncIterator() method which is the stream we created earlier:

<span class="hljs-comment">//..</span>
<span class="hljs-function"><span class="hljs-keyword">func</span> <span class="hljs-title">makeAsyncIterator</span><span class="hljs-params">()</span></span> -&gt; <span class="hljs-type">AsyncIterator</span> {
    <span class="hljs-keyword">guard</span> <span class="hljs-keyword">let</span> stream = stream <span class="hljs-keyword">else</span> {
        <span class="hljs-built_in">fatalError</span>(<span class="hljs-string">"stream was not initialized"</span>)
    }
    socket.resume()
    listenForMessages()
    <span class="hljs-keyword">return</span> stream.makeAsyncIterator()
}
<span class="hljs-comment">// ...</span>

Prior to returning the steam’s AsyncIterator we also call the listenForMessages() method defined below:

<span class="hljs-keyword">private</span> <span class="hljs-function"><span class="hljs-keyword">func</span> <span class="hljs-title">listenForMessages</span><span class="hljs-params">()</span></span> {
    socket.receive { [<span class="hljs-keyword">unowned</span> <span class="hljs-keyword">self</span>] result <span class="hljs-keyword">in</span>
        <span class="hljs-keyword">switch</span> result {
        <span class="hljs-keyword">case</span> .success(<span class="hljs-keyword">let</span> message):
            continuation?.yield(message)
            listenForMessages()
        <span class="hljs-keyword">case</span> .failure(<span class="hljs-keyword">let</span> error):
            continuation?.finish(throwing: error)
        }
    }
}

When the socket receives a message, depending on the result we signal a new value to the iterator via the continuation’s yield method or finish it with a failure in the event of an error.

Given that the socket’s receive method registers a one-time callback, we need to recursively call this method in the event of a success to continue listening to messages as long as the asynchronous task is running.

Now that our WebSocketStream class is complete, let’s see how we can go about listening and reacting to it’s events in a SwiftUI View

Putting together a Mock WebSocket Server

To demonstrate our WebSocketStream, we will be leveraging the Overseed platform to set up our mock WebSocket server. Overseed is a data platform that enables you to easily generate streams of synthetic data according to a defined schema complete with frequency and probability specifications.

We will be connecting to a WebSocket server I put together that generates randomized data for battery percentages every 3 seconds across three devices: iPad Pro, Apple Watch and Air Pods. The message emitted is a json string in the following format:

{
    <span class="hljs-string">"record"</span>: {
        <span class="hljs-string">"device_name"</span>: <span class="hljs-string">"IPad Pro"</span>,
        <span class="hljs-string">"battery_level"</span>: <span class="hljs-string">"53"</span>
    }
}

Reacting to WebSocket Messages in SwiftUI

<span class="hljs-keyword">import</span> SwiftUI

<span class="hljs-class"><span class="hljs-keyword">struct</span> <span class="hljs-title">ContentView</span>: <span class="hljs-title">View</span> </span>{
    @<span class="hljs-type">State</span>
    <span class="hljs-keyword">private</span> <span class="hljs-keyword">var</span> devices: [<span class="hljs-type">Device</span>] = [
        <span class="hljs-type">Device</span>(name: <span class="hljs-string">"iPad Pro"</span>,
               batteryLevel: <span class="hljs-number">100</span>),
        <span class="hljs-type">Device</span>(name: <span class="hljs-string">"Apple Watch"</span>,
               batteryLevel: <span class="hljs-number">100</span>),
        <span class="hljs-type">Device</span>(name: <span class="hljs-string">"Air Pods"</span>,
               batteryLevel: <span class="hljs-number">100</span>)
    ]
    <span class="hljs-keyword">private</span> <span class="hljs-keyword">let</span> stream = <span class="hljs-type">WebSocketStream</span>(url: <span class="hljs-string">"wss://stream.overseed.io:443/v1/generators/org/68fb8641-e958-4c8a-84e0-bd24b199a2e7/generator/5f47628e-d92c-449b-8274-b690d2135204/stream/-1/?stream_token=eyJhbGciOiJIUzI1NiIsInR5cCI6IkpXVCJ9.eyJpYXQiOjE2MzYwNzIwNDIsImlkIjoiM2ZmNGFiNzctMTc0Zi00ZGYzLWIyNzgtZmYyMGUzYzM3MDVhIn0.yhxB50P-61y8hDosif8pYQEle7QBf-ZwLOEJwXYO4kc"</span>)
    <span class="hljs-keyword">var</span> body: some <span class="hljs-type">View</span> {
        <span class="hljs-type">NavigationView</span> {
            <span class="hljs-type">List</span> {
                <span class="hljs-type">ForEach</span>(devices) { device <span class="hljs-keyword">in</span>
                    <span class="hljs-type">HStack</span>(spacing: <span class="hljs-number">0</span>) {
                        <span class="hljs-type">Image</span>(systemName: device.icon)
                            .resizable()
                            .aspectRatio(contentMode: .fit)
                            .frame(width: <span class="hljs-number">32</span>)
                        <span class="hljs-type">VStack</span>(alignment: .leading, spacing: <span class="hljs-number">0</span>) {
                            <span class="hljs-type">Text</span>(device.name)
                                .font(.title3)
                                .fontWeight(.bold)
                            <span class="hljs-type">ProgressView</span>.<span class="hljs-keyword">init</span>(value: device.batteryLevel/<span class="hljs-number">100</span>)
                                .padding(.top, <span class="hljs-number">10</span>)
                                .animation(.<span class="hljs-keyword">default</span>, value: device.batteryLevel/<span class="hljs-number">100</span>)
                        }
                        .padding(.leading, <span class="hljs-number">20</span>)
                    }
                    .padding()
                }
            }
            .listStyle(.insetGrouped)
            .task {
                <span class="hljs-keyword">do</span> {
                    <span class="hljs-keyword">for</span> <span class="hljs-keyword">try</span> await message <span class="hljs-keyword">in</span> stream {
                        <span class="hljs-keyword">let</span> updateDevice = <span class="hljs-keyword">try</span> message.device()
                        devices = devices.<span class="hljs-built_in">map</span>({ device <span class="hljs-keyword">in</span>
                            device.id == updateDevice.id ? updateDevice : device
                        })
                    }
                } <span class="hljs-keyword">catch</span> {
                    <span class="hljs-built_in">debugPrint</span>(<span class="hljs-string">"Oops something didn't go right"</span>)
                }
            }
            .navigationTitle(<span class="hljs-string">"My Devices"</span>)
        }
    }
}

Above we put together a view that performs an asynchronous task when it appears via the task(priority:_:) method. In the task we await and decode each message from our WebSocketStream into a Device and update our view’s local @State property to reflect the changes in our UI.

.task { <span class="hljs-keyword">do</span> { <span class="hljs-keyword">for</span> <span class="hljs-keyword">try</span> await message <span class="hljs-keyword">in</span> stream { <span class="hljs-keyword">let</span> updateDevice = <span class="hljs-keyword">try</span> message.device() devices = devices.<span class="hljs-built_in">map</span>({ device <span class="hljs-keyword">in</span> device.id == updateDevice.id ? updateDevice : device }) } } <span class="hljs-keyword">catch</span> { <span class="hljs-built_in">debugPrint</span>(<span class="hljs-string">"Oops something didn't go right"</span>) } }

As long as the task is running, the view will continue to process updates and display the battery info of our devices based on the last received message.

By attaching our task to the lifetime of the view, SwiftUI will cancel the task when it removes the view invoking the onTermination callback of our stream’s continuation object, resulting in the cancelation of our socket task.

Conclusion

A WebSocket is a great solution for providing a persistent two-way communication layer between a client and a server. In this article we discovered how we can leverage the power of AsyncSequence to put together an idiomatic concurrency api for connecting and listening to WebSocket events in a Swift application.